
How to Make a Music Video: Music Video Production Tips - 2024 - MasterClass.
Welcome to the ultimate guide on mastering YouTube monetization! If you've ever dreamed of turning your passion for creating videos into a lucrative income stream, you're in the right place. In this comprehensive guide, we'll walk you through everything you need to know to start earning money on YouTube, from understanding different monetization methods to maximizing your revenue potential.
We'll explore the diverse ways YouTubers can monetize their content, whether it's through advertising, affiliate marketing, sponsored content, or even selling your own products. Plus, we'll delve into the importance of engagement, finding your niche, and building a loyal audience that supports your channel. Let's embark on this exciting journey together and turn your YouTube dreams into reality!
1. Music and Conceptualization

Before diving into shooting and making a music video however, it's crucial to nail down two key aspects—the one making a music video, and the other footage and concept. In the world of music video production, there are two primary scenarios filmmakers often encounter.
Scenario 1: You have a concept in mind but are searching for the perfect music to match. For example, you may want to create a montage video of your travels but are on the hunt for the ideal music track.
To ensure you listen when you choose to listen to the right music, consider the following tips:
1. Understand Your Message: Define the purpose and emotions you want to convey in your video.
2. Search by Mood: Determine the mood you want to evoke and select music accordingly.
3. Choose Genre, Pace & Tempo: Align the music's tempo and genre with the pacing and style of your video.
4. Decide on the Role of the Music: Determine how prominent you want the music to be and its intended effect on the viewer.
5. Utilize InVideo's Music Library: Access thousands of copyright-free tracks in InVideo's music library to find the perfect soundtrack for your video.
Once you've selected the right music, you can seamlessly integrate it into your video and elevate the viewing experience.
Now, let's explore Scenario 2: The music track has been produced, and it's time to conceptualize the song and shoot the music video.
Factors to consider during conceptualization include:
A. The Setting: Choose a setting that complements the tone and ambiance of the music.
B. Video Type: Decide whether your video will be narrative-based or performance-based.
C. Still Images: Use still images to inspire and visualize scenes for your music video.
D. Treatment: Develop a treatment—a creative outline outlining the video's concept, visual style, and narrative approach.
By carefully considering these factors and crafting a compelling treatment, you can bring your music video concept to life and captivate your audience.
With these insights and tips, you're equipped to embark on your own film and music video production journey with confidence and creativity. So, let's turn your vision making music videos into reality and create an unforgettable music video experience!
2. Storyboarding
If you're delving into the world of music video production, mastering the art of storyboarding is essential. A storyboard serves as a visual roadmap, combining the script with corresponding visuals for each scene, enabling you to break down your concept visually and focus on key visuals.
Here are three steps to create an effective storyboard for your music video:
Step 1: Scene Planning
Divide your storyboard scene by scene, depicting various shots within specific rectangular frames that complement the aspect ratio of your video. Whether you sketch on paper, use a computer, or a tablet, start with a basic sketch of each scene, indicating the visuals and key production details such as lighting and camera placement. This process provides a clear overview of how the story unfolds and helps communicate the concept to your team or clients.
Step 2: Establishing the Types of Shots
Distinguish between wide establishing shots and close-up shots to effectively convey the narrative. Begin with establishing shots to set the scene, then progress to close-ups to capture details and emotions. You don't need advanced artistic skills—simple stick figures can suffice to illustrate the action. Consider referencing shots or mock shoots with your phone to visualize each shot's composition and perspective. Adapt your lighting and camera placement based on the types of shots you intend to capture.
Step 3: Scene Breakup
Break down each scene into individual components within rectangular scene templates, known as shots. In your storyboard, mark out camera placements and key elements within each shot to guide production planning. This detailed breakdown ensures that every aspect of the scene is accounted for and contributes to the overall visual narrative.
Here's a simple storyboard template to help you get started. Additionally, check out this video for more tips and insights on storyboarding techniques.
With your storyboard in hand, you're ready to move on to location scouting and bring your music video concept to life.
3. Location Scouting Based on Your Storyboard
Location scouting is a critical aspect of music video production, and the decisions to find locations that you make can significantly impact the final video camera final result. Here's a breakdown of factors to consider when scouting for locations:
(A) Budget:
Determine your budget and find a location that aligns with both your financial constraints and video concept. Consider options like studios or live music venues for performance-based editing music videos only, and utilize resources like peerspace to streamline your search process.
(B) Dimensions:
Assess whether the location can accommodate your production and crew requirements in terms of height, width, and length, as dictated by your storyboard and production needs.
(C) Weather:
Weather conditions can affect outdoor shoots, so plan accordingly and monitor weather forecasts to mitigate potential disruptions and safeguard your equipment.
(D) Location Options and Recces:
Explore indoor and outdoor locations that suit your concept, considering factors like ambient settings, natural landscapes, and necessary permissions. Conduct reconnaissance visits to assess accessibility, shooting hours, and potential angles for different shots.
(E) Scout for Leading Lines & Symmetry in the Frames:
Look for elements within the location that can enhance visual aesthetics, such as leading lines that guide viewers' attention and symmetry that creates visual balance. Planning for these elements during scouting can streamline the shooting process and contribute to a visually compelling music video.
By carefully considering these factors during location scouting, you can ensure that your chosen locations align with your vision for the music video and contribute to its overall success. With your locations secured, it's time to focus on planning your shots and production schedule to bring your vision to life.
4. Planning Your Shots and Production Schedule
Planning your shots and schedule is a crucial step in the process of creating a great music video together, as it sets the foundation for a smooth and efficient post production phase. Here's a breakdown of key aspects to consider when making music videos:
(A) Create a Shot List & Production Schedule Based on Your Storyboard:
Develop a detailed shot list that outlines each scene's requirements, including equipment, cast, and crew members, and schedule start shooting. This document helps ensure that all necessary elements are accounted for during filming. Additionally, create a production schedule that specifies shooting locations, scenes, required equipment, and personnel. Regular updates and sharing of this schedule with the team are essential for effective coordination.
(B) Communicate Expectations:
Clear communication of expectations with your other crew members and vendors is paramount. Provide thorough explanations of each scene's requirements and objectives, and remain open to questions and suggestions. Ensuring everyone understands their roles and responsibilities helps streamline the production process.
(C) Hiring Equipment:
Assess your production company for equipment needs and determine whether any additional items need to be hired for specific shoot days. Consider factors such as cameras, lenses, lighting, and accessories, and ensure that all necessary equipment is available and accounted for in the production schedule.
(D) Rehearse Before Shoot:
Schedule rehearsals before shooting to identify any potential issues or shortcomings. This proactive approach allows you to address any challenges and refine your plans, ultimately saving time and minimizing disruptions during filming.
(E) Plan Your Props:
Evaluate the props required for each scene and include them in your production schedule. Consider factors such as prosthetics, costumes, and custom-made or hired props, and ensure that arrangements are made well in advance to avoid last-minute delays.
By following these steps and meticulously planning your shots and shooting schedule, you can maximize efficiency, minimize costs on limited budget, and ensure a successful music video production. Next up, we'll delve into equipment considerations for your project.
5. Equipment
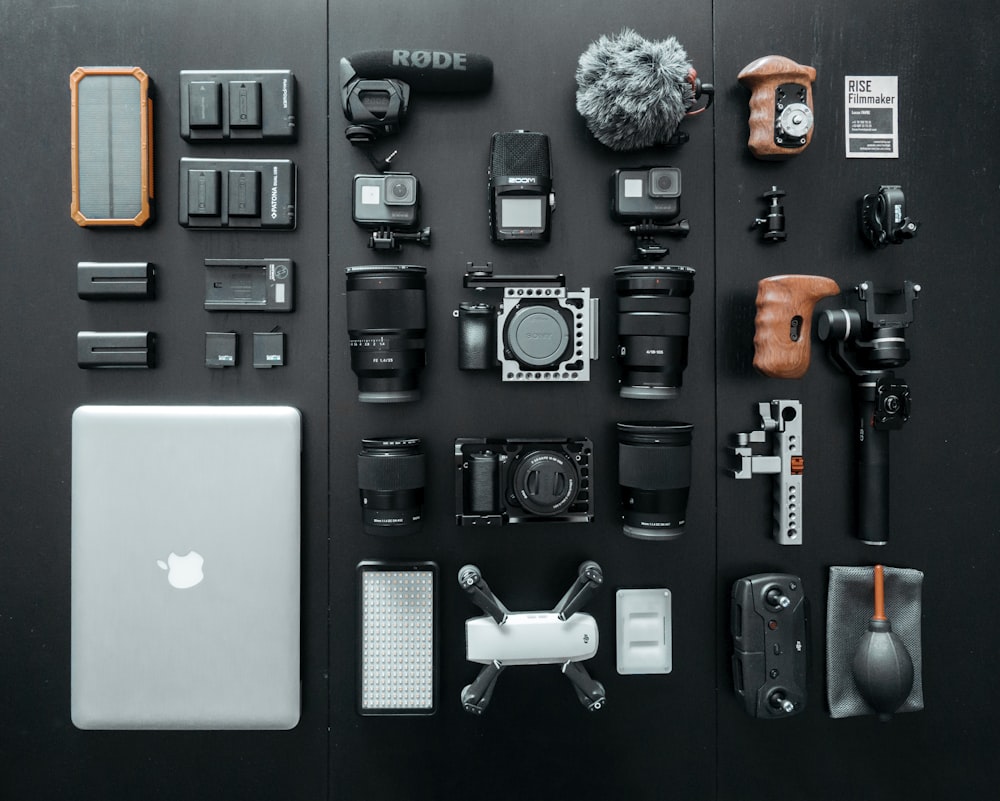
When it comes to creating a music video, having the right equipment is crucial for capturing high-quality footage and audio. Here's a breakdown of the types of equipment you'll need, along with our recommended best buy options for both basic starter and professional kits:
A. Basic Starter Kit:
1. Camera:
- Use a smartphone or invest in a DSLR or mirrorless camera such as the Canon EOS REBEL T7 or Sony Alpha a6000.
2. Lenses:
- Consider the Sigma 30mm F1.4 Contemporary DC DN Lens for Sony E.
3. Stabilizers:
- Options include the Neewer Portable Shoulder Rig or Manfrotto Compact Action Aluminum Tripod Kit.
4. Light:
- Choose from on-camera LED light panels like Godox stick lights or GVM LED Video Lighting Kits.
5. Audio:
- Utilize shotgun mics like the RODE VideoMicro Compact On-Camera Microphone.
6. Software:
- Use InVideo for templates and Premiere Pro for detailed editing control.
B. Professional Kit:
1. Camera:
- Opt for cameras like the Panasonic LUMIX GH5 or Canon EOS R for professional-grade footage.
2. Lenses:
- Consider the Sigma 18-35mm F1.8 Art DC HSM Lens for Canon.
3. Filters:
- PolarPro or Tiffen variable neutral density filters.
4. Stabilizers:
- Choose stabilizers such as the Manfrotto Professional Fluid Video System or DJI Ronin-S.
5. Light:
- Use lighting options like the Aputure Amaran MC RGBWW Mini On-Camera Video Light or HPUSN Softbox Lighting Kit.
6. Audio:
- Opt for the Rode VideoMic Pro+ Compact Directional On-Camera Shotgun Condenser Microphone.
7. External Camera Monitors:
- Consider options like the Blackmagic Design Video Assist or Atomos Ninja V.
8. Software:
- InVideo for shorter videos and Premiere Pro for detailed editing.
With the the right tools and equipment in hand, you're well-equipped to embark on your first music video and production journey. Next up, let's dive into the importance of assembling the right team for your project.
6. Casting and Crew
This is your dream team for creating a high-quality music video:
A) Director’s Department:
1. Director: The visionary behind the project, responsible for translating the creative vision into reality.
2. Assistant Director (1): Supports the director in coordinating the production schedule, managing the cast and other crew members, and ensuring the smooth execution of the director's vision.
3. Assistant Director (2): Assists with organizing logistics, coordinating rehearsals, and overseeing safety protocols on set.
B) Production Design:
1. Art Directors: Responsible for the overall visual aesthetic of the music video, including set design, color schemes, and artistic direction.
2. Set Dressers: Arrange and decorate sets to create the desired atmosphere and ambiance for each scene.
3. Prop Designers: Create and source props visual effects that enhance the storytelling and visuals of the music video.
4. Hair and Makeup Artists: Transform the appearance of performers to align with the creative vision of the music video director.
5. Set Builders: Construct and assemble sets according to the specifications outlined in the storyboard and production design plans.
C) Cinematography Department:
1. Director of Photography: Oversees the camera and lighting crews, collaborates with the director to achieve the desired visual style, and ensures technical excellence in cinematography.
2. Gaffer: In charge of lighting design and execution, responsible for creating the appropriate mood and atmosphere through lighting setups.
3. Key Grip: Manages camera support equipment, rigging, and safety during filming.
4. Best Boy: Assists the band members sound man, key grip and gaffer with lighting and grip equipment setup and maintenance.
5. Lamp Ops: Operate lighting fixtures and assist with adjustments as needed.
6. DMT (Digital Media Technician): Manages and maintains digital camera equipment, including cameras, lenses, and accessories.
Each member of this team plays a crucial role in bringing the music video to life, ensuring that every aspect, from visual aesthetics to technical execution, is executed with precision and creativity. If you want to delve deeper into the responsibilities of each crew member, you can explore further reading on their roles and contributions to the production process.
7. Filming Your Music Video

As you embark on the journey of creating start filming your own music video, here are some essential tips to ensure a smooth and successful video shoot:
(A) Composition and Framing of Shots:
- Utilize the rule of thirds to create visually appealing compositions by placing subjects or focal points at the intersections of the grid.
- Create depth in the frame by using multiple angles, setting the focus off-center and varying the distance between objects and the camera.
- Pay attention to location details observed during pre-production, incorporating leading lines and symmetry for aesthetically pleasing shots.
(B) Plenty of Light:
- Prioritize lighting during pre-production planning and execute it effectively during filming.
- Understand the advantages and disadvantages of both natural light and artificial lighting sources.
- Use diffusers, reflectors, or artificial lighting techniques to achieve desired lighting effects and minimize shadows.
(C) Crisp and Clear Audio:
- Invest in a good microphone to capture high-quality audio, considering budget-friendly options if necessary.
- Position audio equipment close to subjects to ensure clear audio recording, and use pop filters to reduce unwanted noise.
- Pay attention to audio quality, especially for narrative-based music videos, to enhance viewer engagement and retention.
(D) Film in Small Segments:
- Break down your script into smaller segments or takes to facilitate shooting and editing processes.
- Capture multiple takes of each scene to provide flexibility during the editing phase and ensure optimal footage selection for final cut.
- Incorporate B-roll and stock footage to add variety and interest to your music video, planning its use in advance to streamline post-production.
By applying these tips, you can enhance the visual and auditory quality of your music video while streamlining the filming process for a more efficient and effective production.
8. Editing and Color Correction

When it comes to editing your first music video, this is your chance to unleash your creativity and bring your vision make a music to life. Here are some essential tips and tools to help you navigate the editing process:
(A) Organization:
Efficient organization of your footage is key to speeding up your editing process. Consider labeling and categorizing your clips by specific shot type or take to streamline your workflow. This organization will not only help you find your footage quickly but also enable faster editing.
(B) Edit the Music Video "Performance" First:
Start by assembling all the performance shots to create a cohesive performance video. Once you have established the core of your video, you can then integrate B-roll footage to enhance storytelling and maintain viewer engagement. Focusing on the one big performance video first can expedite the editing process.
(C) Edit to the Beat or Rhythm of the Music:
Sync your edits with the rhythm and beat of the music to create a seamless and engaging experience for the viewer. Use the music as a guide to influence your editing decisions and enhance the overall impact of your music video. This synchronization adds a dynamic element to your video and reinforces its connection to the music.
(D) Develop Your Own Unique Editing Style:
Experiment with different editing techniques, visual and sound effects,, and transitions to develop your signature editing style. Embrace creativity and explore various editing tools and visual and sound effects throughout, to make your music video stand out. Practice and experimentation are essential for refining your editing skills and establishing a distinctive style.
(E)Color Correction:
Pay attention to color correction to ensure consistency and enhance the cinematic quality of your music video. Adjust exposure, contrast, and color balance to achieve a cohesive and visually appealing look across multiple videos of your footage. Consistent color correction contributes to the overall quality and professionalism of your music video.
InVideo offers a user-friendly platform with a wide range of templates and media assets to streamline the editing process for videos up to 15 minutes long. For more advanced video editing software, Adobe Premiere Pro provides comprehensive tools and features for professional-level video editing.
By incorporating these tips and utilizing the available video editing software resources, you can create a high-quality music video that captivates and resonates with your audience.
9. Distribution and Promotion
Distribution and Promotion:
After creating your music video, the next crucial step is to distribute and promote it effectively to reach your target audience and maximize its impact. Here's how you can strategize your distribution and promotion efforts:
Platforms:
1. YouTube: YouTube videos remains one of the most popular platforms for sharing music videos due to its vast audience reach and accessibility. Upload your music video to your YouTube channel, optimizing it with relevant keywords, tags, and descriptions to improve visibility. Additionally, create a captivating thumbnail for youtube video and craft an engaging title to entice viewers to click and watch your video.
2. Social Media: Utilize various social media platforms such as Instagram, Facebook, Twitter, and TikTok to promote your music video to a broader audience. Share teasers, behind-the-scenes footage, and snippets from the video to generate excitement and anticipation among your followers. Leverage features like Instagram Stories, IGTV, and Facebook Live to interact with your audience and encourage engagement.
3. Streaming Services: Consider distributing your music and video content on streaming platforms like Spotify, Apple Music, and Tidal, where users can discover and enjoy visual content alongside audio tracks. This allows you to reach music enthusiasts who prefer streaming services for their entertainment needs.
Marketing:
1. Captivating Thumbnail and Engaging Title: A visually appealing thumbnail and a compelling title are essential elements that can significantly impact the success of your music video. Create a captivating thumbnail that accurately represents the content of the song and your video and sparks curiosity among potential viewers. Similarly, craft an engaging title that captures the essence of your music video and intrigues viewers to click and watch.
2. Teasers and Behind-the-Scenes Content: Generate excitement and anticipation for your music video by releasing teasers and behind-the-scenes content leading up to its official release. Teasers provide a sneak peek into the video, while behind-the-scenes footage offers insights into the creative process of making music videos and showcases the efforts behind its production. Share these snippets across your social media channels to build anticipation and attract attention to your upcoming release.
3. Collaborations: Collaborate with other artists, influencers, or content creators to expand your reach and tap into their existing fan base. Collaborative efforts can include featuring guest artists in your music video, cross-promoting each other's content, or participating in joint marketing campaigns. By leveraging the collective reach and influence of your collaborators, you can amplify the visibility and impact of your music video.
In summary, strategic distribution and promotion are essential for ensuring the success of your music video. By leveraging platforms like YouTube and social media, optimizing your content with captivating visuals and titles, and implementing effective marketing strategies such as teasers, behind-the-scenes content, and collaborations, you can maximize the reach and engagement of your music video among your target audience.
BONUS: Make a Music Video in Three Steps using Onemaker.io

Onemaker.io is your go-to platform for crafting stunning music videos effortlessly. With its intuitive interface and robust features, it empowers creators of all levels to produce professional-grade videos with ease. Access a vast library of royalty-free music, video clips, and effects, or upload your own footage for complete customization. Plus, being cloud-based means you can work from anywhere, anytime. Say goodbye to expensive software and hello to efficient, cost-effective video production. Onemaker.io: Where creativity meets convenience.
Here's how you can make a music video in three simple steps using Onemaker.io:
Sure, I'd be happy to walk you through the steps of using OneMaker.io:
1. Sign up and log in:
- Visit OneMaker.io and click on the "Sign Up" button.
- Fill out the required information such as your email address, username, and password.
- Once you've signed up, log in using your credentials.
2. Navigate different types of categories:
- After logging in, you'll likely land on the homepage or dashboard.
- Browse through the various categories available on the platform like Lyric Videos, LoFi videos, EDM, relaxation, Music Visualisers etc.
- Click on a category that best fits the type of video you want to create.
3. Choose the template:
- Within your chosen category, you'll see a selection of templates.
- These templates serve as a starting point for your video and provide a framework for your content.
- Review the available templates and select the one that aligns with your vision.
4. Customize your video:
- Once you've chosen a template, you can begin customizing your video.
- Depending on the template and the features of OneMaker.io, you'll have options to add text, images, animations, music, and other elements to your video.
- Follow the platform's intuitive interface to make adjustments to the template to suit your preferences and needs.
5. Preview and export:
- After you've customized your video, it's essential to preview it to ensure everything looks and sounds as you intended.
- Once you're satisfied with the preview, proceed to export your video. This typically involves clicking on 'Make full HD video' tab.
- After exporting, you can download the video file to your device from 'My Videos'.
By following these steps, you should be able to successfully create a video using OneMaker.io. Don't hesitate to explore the platform further and experiment with different templates and customization options to unleash your creativity!
Benefits of Using Onemaker for Creating Music Videos:
1. User-Friendly Interface: Onemaker.io features an intuitive interface that makes it easy for anyone, regardless of their level of experience, to create professional-looking music videos.
2. Cloud-Based Platform: Being a cloud-based platform, Onemaker.io allows users to access their projects from any computer or anywhere with an internet connection. This flexibility enables collaborative editing and seamless creative workflow management.
3. Time and Cost-Efficient: Onemaker.io streamlines the music video creation process, saving users valuable time and resources. By eliminating the need for expensive software and equipment, Onemaker.io offers a cost-effective solution for creating professional-quality music videos.
4. Versatile Output Options: Whether you're looking to share your music video on social media, embed it on your website, or distribute it through other channels, Onemaker.io provides versatile output options to suit your needs.
Overall, Onemaker.io offers a convenient and accessible solution for musicians, content creators, and video enthusiasts to bring their music to life through visually captivating music videos.
Conclusion
In conclusion, creating a captivating music video involves several key steps, each crucial to the success of big performance make a music video and the the final of making a music video product.
Firstly, thorough pre-production planning sets the stage for a smooth filming process. This includes developing a storyboard, scouting locations, planning shots and schedules, assembling the right equipment, and organizing casting and crew.
During filming, attention to composition, good lighting throughout, audio quality, and segmentation of shots ensures the footage is of the highest standard. Utilizing techniques such as the rule of thirds, depth creation, and shooting from various angles enhances the visual appeal and storytelling potential of the video.
Post-production editing is where the magic of film truly happens. Organizing footage, editing performance shots to match the music, syncing cuts to the song and beat, and developing a unique editing style all contribute to a film creating a compelling narrative.
Finally, distribution and promotion are vital steps to ensure the music video reaches its intended audience. Platforms like YouTube, social media, and streaming services offer wide-reaching opportunities for exposure. Crafting engaging thumbnails, titles, and promoting through teasers and collaborations further enhance visibility.
Throughout this process, artists are encouraged to experiment, unleash their creativity, and tell their unique stories through visuals. By embracing each step of music video production with passion and innovation, artists can create unforgettable visual experiences that resonate with audiences worldwide.


